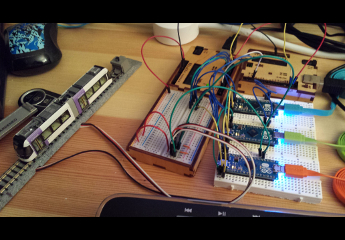
I’ve added a pair of Fritzing drawings to the Switch Machine Controller page. One is a breadboard drawing to give a rough idea of how I’ll be wiring up an Adafruit Pro Trinket 5V (Arduino-class processor) to a pair of L293D drivers, which together will drive up to 4 KATO single-coil switch machines. I’ve also added a schematic of the design as well. I’m in the process of adding a Software section to that page as well, which I plan to have in place this evening, time permitting.

Only way I could see to contact you but thanks for the kato Switch machine cade. As a 70 yr old former engineer with no c, etc programming, but lots of assybler stuff back when I appreciated the approach and concepts of the switch machine, circular buffer and other modules. I did not use the i2c approach as i use an arduino mega with open source DCC++ code ( driven by JMRI) on a ras pi. I can drive 10 or 11 switch machines directly. I modified the dcc++ code to use your lbraries with only a slight mod to the init module to not force a reset as dcc ++ saves the sate in eeprom… i also si ply bought 5 tb6612 surface mounted dev kits from adafruit for 4.95 since I have one crossover, simplifies my efforts standarizing. All works great… as an aside I built a speed controller on arduino to speed match locos but the code is sloppy. May try to convert using ur switch machine idea…someday… anywat thanks for publishing…
LikeLike
Also, if you really want to save Arduino pins, you could connect a few transistors and resistors in a clever way to only use one pin to control each turnout. The idle state would have to be high impedance, which is done by setting the pinMode to INPUT. And when you want to switch the turnout, your have to set it as output, then set the pin high or low depending on which way you want the turnout, then set the pin back to input after 10ms.
LikeLike
Interesting. Can you point me to an example circuit that does that? Sounds similar to a push-pull circuit. Would that be used with a half-bridge like the L293D, or instead of it?
LikeLike
Can’t find an example of it on the web, and I have not really thought it through. But it would be something like this…

It may require some diodes and/or pull up/down resistors in the bases of the transistors… Do not test this directly on the turnouts.
LikeLike
Now that I think of it. It is just an H bridge, with the difference that one direction is enabled on high, and the other is enabled on low.
So this could also be achieved by adding inverters on 2 of the H bridge inputs.
LikeLike
Did you get my first post?
I’m planning something very similar to this and I’m cosidering the following changes.
– Instead of using 3 wires per turnout, I plan to use only 2, by having the bridge always enabled and just switching the correspondent input to HIGH for a short period. Have you tried this? Maybe there is a bad side to this… current leak? Heating?
– For driving the double crossover, you can connect both bridges of the same L293D connected in parallel, so it would support a peak current of 2.4A. However, the datasheet claims these peaks should be shorter than 100us. Since your testing indicates that the ON time should be at least 10ms, I understand that you can increase the max current by simply stacking (or piggybacking) several ICs on top of each other.
What do you think?
LikeLike
Hi Ezequiel,
I have seen your posts, I just don’t necessarily see in a timely manner that I received them. ‘^_^
Your two-wire scheme will work as long as you make sure you pulse one wire or the other high while the other is kept low. I did it my way, using a third wire on enable, so that the other two can retain their “thrown” state (high-low or low-high) so I can put LEDs on them to indicate which way they were thrown. Then the enable is the pulsed line to actually fire the half-H bridge one way or the other.
I haven’t experimented with paralleling the drivers to achieve more current. Subbing a TB6612 for the L293D seemed simpler. I’ve had PCB boards for both varieties made up by oshpark.com. Same size and layout of external connections, only the internal layouts to the drivers differ. I should have some pictures somewhere. If I find them, I should add them to the page.
Thanks for the feedback, that’s one of the reasons I created my blog in the first place.
LikeLike
Ezequiel,
I’ve updated the Switch Machine Controller page with a picture of my PCB boards and their schematics. Check ’em out. ^_^
LikeLike
I was planning on using 2 additional outputs for LEDs, that’s why I was so eager to save pins. It never occured to me to use the same ones. I feel so dumb, lol.
Even if I do manage to control the turnout with a single pin, I could use another single pin to control both LEDs, and I would be using just 2 pins for both control and indicator LEDs, but at the cost of a much more complicated (and potentially more expensive) circuit.
I guess I’ll stick with your design after all. Thanks for all the info!
LikeLike